A tutorial to
MESA
TA-assistant Xiang Ji
What is MESA?
MESA is short for Modules for Experiments in Stellar Astrophysics
| Reference | Description |
|---|---|
| Paxton et al. (2011) | Initial release |
| Paxton et al. (2013) | Planets, oscillation, rotation, and massive stars |
| Paxton et al. (2015) | Binaries, pulsations, and explosions |
| Paxton et al. (2018) | Convective boundaries, element diffusion and massive star explosions |
| Paxton et al. (2019) | Pulsating variable stars, rotation, convective boundaries, and energy conservation |
| Jermyn et al. (2023) | Time-dependent convection, energy conservation, automatic differentiation, and infrastructure |
| .... |

(c) www.kitp.ucsb.edu
1. Installing MESA
A Stars & Planet tutorial by TA-assistant Xiang Ji
A quick start guide to the MESA template project
We offer three methods to run MESA simulations
These are identified by different colors
- Install and run MESA on your own machine.
- Run MESA on
our shared server
Europa, which is adminstered by us - Run MESA on MESA-web: http://user.astro.wisc.edu/~townsend/static.php?ref=MESA-Web
| Run simulations on | Pros | Cons |
|---|---|---|
| Local machine | Real-time visualization of computational results No Internet required Fully control of simulations | Installation required (Linux and Mac only!) |
Europa | No installation required Fully control of simulations | Internet access required No on-the-fly visualization |
| MESA-web | No installation required Visualization of results after completion | Internet access required Partial control of simulations |
| Choose the method according to your needs. |
Local MESA installation
Please follow the instruction here to install MESA.
- Get the prerequisites. You may need to install manually all the dependencies, including
binutils, make, Perl, X11, ZandCshell on Linux andXcode, Xcode command line toolsandXquanrtzon Mac. For example, on Ubuntu system you may run the following command to get them:
sudo apt install binutils make perl libx11-6 libx11-dev zlib1g zlib1g-dev tsch
NOTE! Unfortunately, MESA doesn't work on Windows system. You need to download Windows Subsystem for Linux firstly. See https://learn.microsoft.com/en-us/windows/wsl/install for instructions. - Install MESA SDK
- Install MESA.
TA Zhixuan & Xiang are happy to help you out with any installation issues
Local MESA installation
- Get the prerequisites.
- Install MESA SDK. MESA SDK provides a pre-built set of compilers and run-time libraries that should make your MESA installation go smoothly.
We show the installation on Ubuntu system as an example. For Mac users, please follow the instructions on its website.
- Firstly, find the correct version and download it from its website
- Extract it with the command
tar xvfz $package_name -C ~/ - Set the path to SDK by adding the following line to
~/.bashrc:
export MESASDK_ROOT=~/mesasdk - Initialize SDK with the command:
source ~/.bashrc
source $MESASDK_ROOT/bin/mesasdk_init.sh
- To check if MESA SDK is installed properly, run
gfortran --versionin the terminal and the output should begin with:GNU Fortran (GCC) 9.2.0
- Install MESA.
Local MESA installation
- Get the prerequisites.
- Install MESA SDK.
- Install MESA.
- Firstly, Download a zip file of the latest MESA release from its website.
- Set the environment variables. If you use Linux (or WSL) system, you may just copy the example on the right.
- Compile the code by running the following command:
source ~/.bashrc
cd $MESA_DIR
./install
- A message
MESA installation was successfulis expected once it is done.
export MESA_DIR=/Users/my_username/Software/mesa-r24.08.1
export OMP_NUM_THREADS=2
export MESASDK_ROOT=/Applications/mesasdk
source $MESASDK_ROOT/bin/mesasdk_init.sh
export PATH=$PATH:$MESA_DIR/scripts/shmesa
Please set MESA_DIR to be the directory to which you downloaded MESA, and set OMP_NUM_THREADS to be the number of cores on your machine. The third and fourth command should be already added when you set up the MESA SDK.
Run MESA on local machine
We are now going to simulate the evolution of a 15 mass star from a pre-main sequence model until the zero-age main sequence (ZAMS) is reached. The code has already been written in the directory $MESA_DIR/star/work. However, instead of running the code in that directory, it's highly recommended to store and perform the work somewhere else. Let's run the following command:
cp -r $MESA_DIR/star/work ~/work_dir/mesa_tutorial
Please, modified the second directory according to your machine.
Next, compile and run the code by typing:
cd ~/work_dir/mesa_tutorial
./mk
./rn
A new directory star is expected after the second command.
Run MESA on local machine
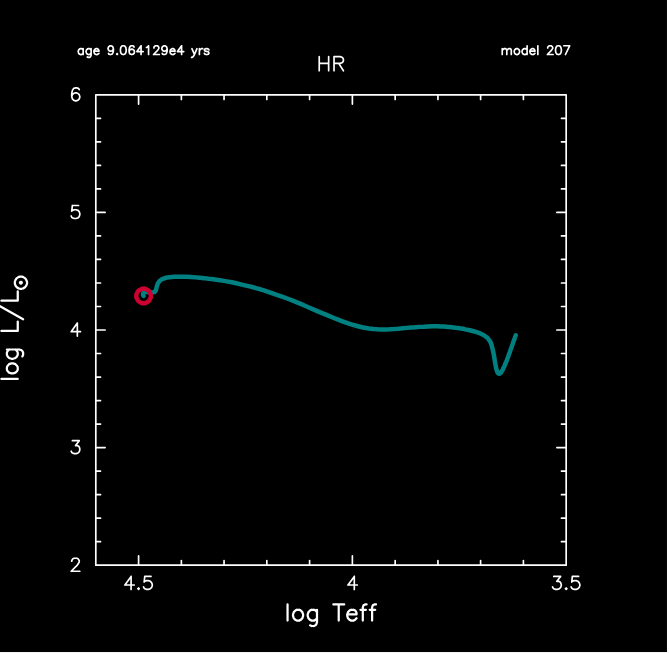
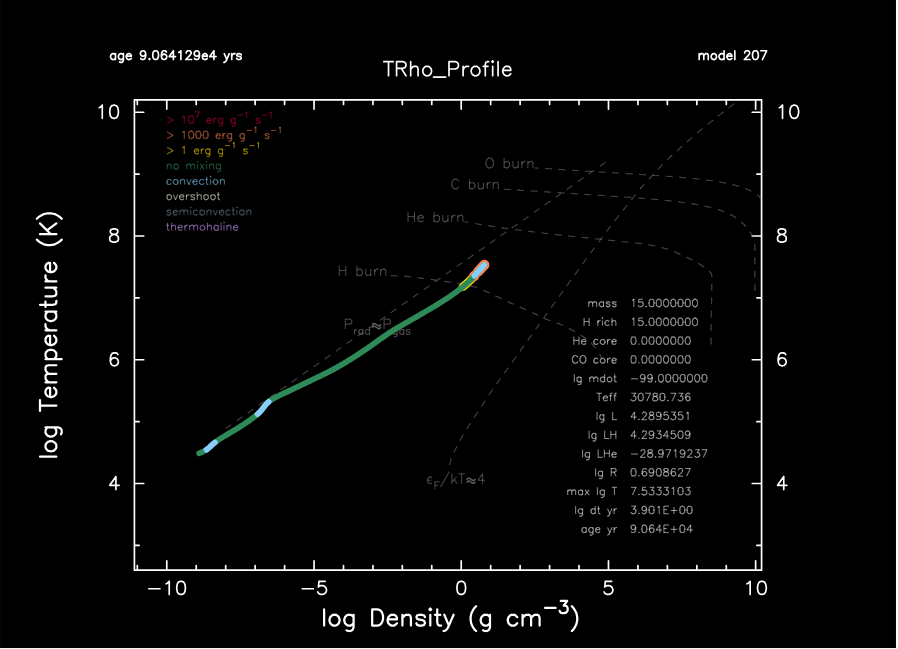
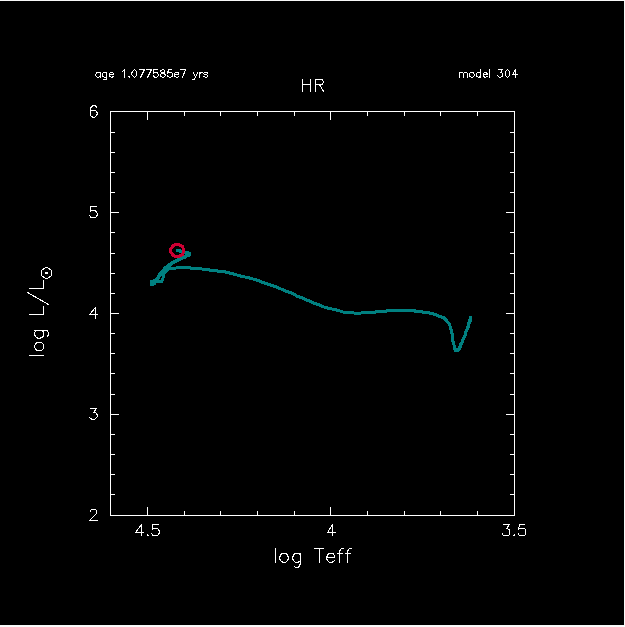
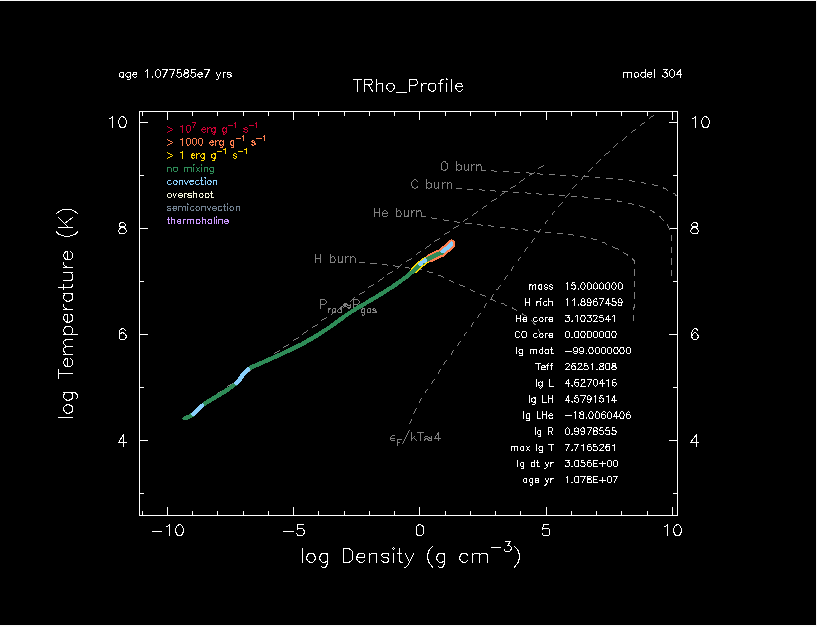
Once MESA is running, it will keep your updated through terminal output. As we promised before, MESA can automatically convert data into real-time HR diagram and internal temperature-density profile shown on the right.
The simulation should terminate after 207 steps with the following message:
stop because Lnuc_div_L>=Lnuc_div_L_zams_limit
New directory LOGS and photos are expected after the code finishes.
The photos files are machine readable binaries, where the models from MESA are saved. The LOGS include all you need for data analysis. They are text-based and can be fed into your favourite plotting program.
Continue with → Resuming Model
Run MESA on Europa
Firstly, one needs to get connection to Europa, for which ssh (secure shell) is recommended.
- Run the following command to generate a pair of ssh keys in
~/.ssh:
ssh-keygen -t ed25519Windows users: execute in VScode; see instructions →
- Copy contents in
~/.ssh/id_ed25519.puband submit to one of the TAs (Zhixuan & Xiang). We will make sure thatEuroparecognizes your identification. - Meanwhile, edit the
~/.ssh/configfile according to the example on the right. - You should be able to connect to
Europaby running the commandssh Europain the terminal (windows: VScode) and typing in the passwordmesaproject.
Host Jupiter
    HostName 166.111.121.30
    Port 2222
    User ormel
    IdentityFile C:\\... #windows only
Host Europa
    HostName 166.111.191.205
    User starplanet
    ProxyCommand ssh -W %h:%p Jupiter
NOTE!
For Windows system users, you should install vscode and run all the commands above therein. Also, you need to inform the machine where to find your private key. Please, add IdentityFile "C:\\Users\\$USERNAME\\.ssh\\id_ed25519" to the end of Host Jupiter block.
Run MESA on Europa
- The user account on the machine is
starplanet. This is shared among all students. Therefore, each of you works in a separate directorycd ~/Students/$NAME #go to your directory. #Always do this first! cp -r $MESA_DIR/star/work ~/Students/$NAME/tutorial #copy essential informationwhere$NAMEhas been given to you by your TA - The rest steps are very similar to running MESA on a local machine:
cd ~/Students/$NAME/tutorial
./mk
./rn
NOTE!
Please ensure all the change you make on Europa is in the ~/Students/$NAME directory. DO NOT EDIT OTHER STUDENT'S FILES! Only create files under ~/Students/$NAME dir
Run MESA on MESA-web
MESA-web is a web-based interface that allows users to run MESA without installing any software locally. Follow this instruction to have fun on MESA-web.
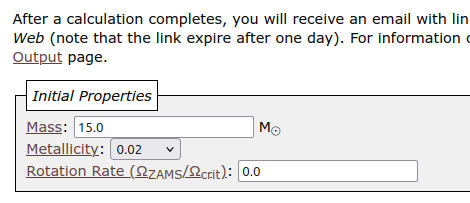
- Go to its website http://user.astro.wisc.edu/~townsend/static.php?ref=mesa-web and scroll down to find the calculation submission page.
- For this tutorial, change stellar mass to be 15 solar mass in the initial properties section.
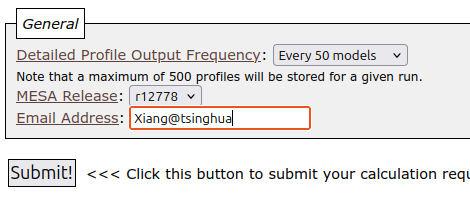
- Type in your email address at the bottom of the page and click
Submit!. - An email is expected after dozens of minutes, where you can find the link to download outputs.
Run MESA on MESA-web
Several output files are provided:
- summary animation (
.mp4format) -
profile*.datafiles, which can be used to analyze the process
- Why does the video seem to "freeze" after ~2000th model?
- Why does the video look differently from previous results?
2. Running MESA
A Stars & Planet tutorial by TA-assistant Xiang Ji
MESA Input
MESA offers a variety of input options. The code get these information from input files inlist and inlist_project.
- The
inlistfile is the first input file that MESA reads, which is often used to direct MESA to other input files. - The
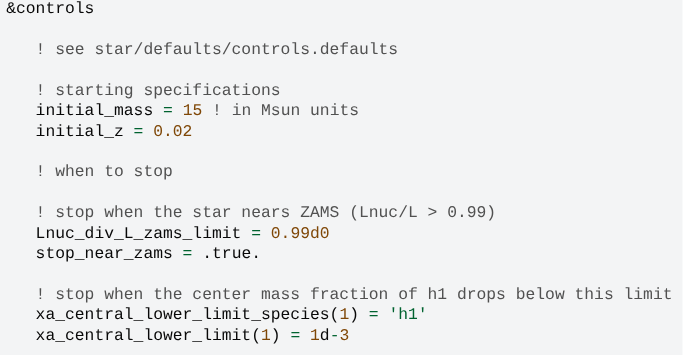
inlist_projectfile includes options that we use to construct the model.See all the options in
$MESA_DIR/star/defaults/controls.defaults.MESA-web can automatically generate a MESA-style
inlistfrom the options you make on the calculation submission page. You can download it together with the outputs. Copy that file toEuropaand see if you can get the same results! - Two stopping criterions are listed here, but only the first one works!
A star firstly becomes ZAMS, then exhausted its central hydrogen through nuclear reaction.
Resuming Models
Let's figure out what's the stellar structure when exhausting its central hydrogen. Firstly, turn off the first stopping criterion by editing:
stop_near_zams = .false.
It's not necessary to run the simulation from the very beginning, since you may notice there was a message in the terminal reads:
save photos/x207 for model 207
We can simply restart using the photo and our new setting by running:
./re x207
If everything goes smoothly, this time the simulation will terminate at model 304.
If you run it on your local machine, pgplot figures on the right are expected. The star goes to upper-left in the HR diagram, which is expected.
Useful Input Table
From time to time, MESA seems to "get stuck" and evolves quite slowly. To speed it up, you may want to change:
| Variable Name | Description |
|---|---|
max_years_for_timestep = 0 | max_years_for_timestep <= 0 means no limit. Adjust this value to sample the Main Sequence better. |
mesh_delta_coeff = 1.0d0 | The number of grids will roughly be cut by half if you double the value. |
varcontrol_target = 1d-3 | This is the target value for relative variation in the structure from one model to the next. |
| .... |
Find more options in $MESA_DIR/star/defaults/controls.defaults yourself!
MESA-web Input
We can also select inputs, like the stopping criterion, on MESA-web. By default, MESA-web will terminate the simulation when the iron core collapse. Let's change it to be consistent with our simulation.
- Find the Custom Stopping Condition block, select central hydrogen mass fraction lower limit as quantity, and type 0.001 as value.
MESA output and data analysis
The automatic visualization may not satisfy you all the times. Fortunately, MESA provides us with a Python module mesa_reader to help us visualize and analyze the models. To install it, run the following command:
pip install mesa_reader
In the LOGS directory, two kind of files are expected.
- profile.data: includes detailed information of a selected set of models, one file for each. You may adjust the interval of logged model numbers by adding
profile_interval = 20in the!outputsection ininlist_project. - history.data: includes brief information of another selected set of models, one line for each. You may adjust the interval by adding
history_interval = 5in the!outputsection ininlist_project.
NOTE! upon restarting a model, MESA will not remove any (old/newer) output files. (You may want to do this manually)
NOTE! By default, MESA will only save 100profile.datafiles. Once the number exceeds this limit, it will overwrite the previous files in a circular manner (e.g., saving model 101 in profile2.data). You are able to reset the limit by addingmax_num_profile_models = 300in the!outputsection ininlist_project, but we do recommend you to adjustprofile_intervalfirst to see if that can meet your needs. If there's no limit on the profiles saved, one can easily fill up his disk!
MESA output and data analysis
To load history.data through mesa_reader, one can use the class MesaData:
import mesa_reader as mr
history = mr.MesaData("LOGS/history.data")
ages = history.data("star_age")     # Alternatively, simply ages = h.star_age
The string in the bracket should be the same as the column name in the second line of history.data.
To load profile*.data, one can use the class MesaLogDir:
import mesa_reader as mr
log = mr.MesaLogDir("./LOGS")
p_100 = log.profile_data(100)
p_100 = log.profile_data(model_number = 100)    # This works the same as the previous line.
p_12 = log.profile_data(profile_number = 10)    # You can also use PROFILE number to load the data
p_last = log.profile_data()                     # To load the last profile, model number can be omitted
rho_100 = p_100.Rho                             # Then it works similarly as previous function mr.MesaData
Modify your MESA output
By default, rather limited information can be acquired from profile.data files. In order to draw a Kippenhahn plot, for example, one would be happy to know the mixing type of each grid point. Fortunately, the output files can be easily modified with the following steps, as long as you are not using
MESA-web
. Firstly, copy the namelist file to your own directory.
cp $MESA_DIR/star/defaults/profile_columns.list .
chmod u+w profile_columns.list
Next, search for the quantity in profile_columns.list, which you want to add to the output files, and remove the ! in front of it (i.e., uncomment). In our case, it's mixing_type, so the file should look like:
519   !#Mixing
520    mixing_type ! mixing types are defined in mesa/const/public/const_def
521   !log_D_mix   ! log10 diffusion coefficient for mixing in units of ...
mixing_type=0 means no mixing; 1 is mixing due to convection; 2 mixing due to convective overshoot, etc.
Modify your MESA output
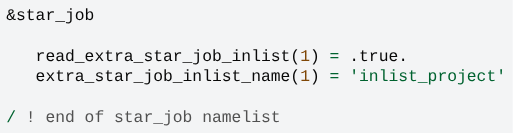
You also need to inform MESA where to get the newly edited output options, which is just the use of inlist file. Please, add the following line to its star_job section:
&star_job
...
    profile_columns_file = 'profile_columns.list'
/ ! end of star_job namelist
Finally, run MESA with the command ./rn. Another column with index 10 and name mixing_type is expected in all the profile.data files. If one wants to add more quantities in the history.data file, just repeat the above process, but do replace all profile with history.
For MESA-web users, you won't have the opportunity to modify your output files. But still, you can infer the mixing type from the column with index 20 and name conv_vel in its default output files.
3. Exercise
Your first run (1 solar mass)
Run a 1 solar mass model with MESA until at least the onset of the Helium flash. See mesaguide.pdf for details. Save the relevant *.data tables. Then use these data tables to make two plots:
- A HR diagram: plot the trajectory of the star in the HR diagram over its lifetime
- A "Kippenhahn" diagram
This is a "space-time" plot where the space (y) dimension represent the mass coordinate of the star and the time (x) dimension time. In this plot you indicate:
- regions that are convective
- regions that generate nuclear energy
NOTE! you should make these plots yourself! Do not post the output of MesaWeb